Computing Actual Areas from a Scale Drawing

Basics on the topic Computing Actual Areas from a Scale Drawing
After this lesson, you will be able to compute the areas of real-life objects based from their scale drawing.
The lesson begins by showing you how to compute for the areas in scale drawings and in real life. It leads you to notice that the actual areas are the areas of the scale drawing objects multiplied by the square of the scale factor. It concludes by proving it is true for every geometric objects.
Learn about computing for actual areas by helping Frank Lloyd Wright build his house project.
This video includes key concepts, notation, and vocabulary such as scale factor (which is the ratio of corresponding measures of an illustrated or projected object to its actual size) and the concept of the actual areas being equal to the areas in the scale drawing times the square of the scale factor.
Before watching this video, you should already be familiar with scale factor, areas of geometric shapes like triangles, quadrilaterals and circles, and operations with exponents.
After watching this video, you will be prepared to apply computation of areas in real-life situations given scale drawing information from blueprints, house plans and project design proposals.
Common Core Standard(s) in focus: 7.GA.1. A video intended for math students in the 7th grade Recommended for students who are 12 - 13 years old
Transcript Computing Actual Areas from a Scale Drawing
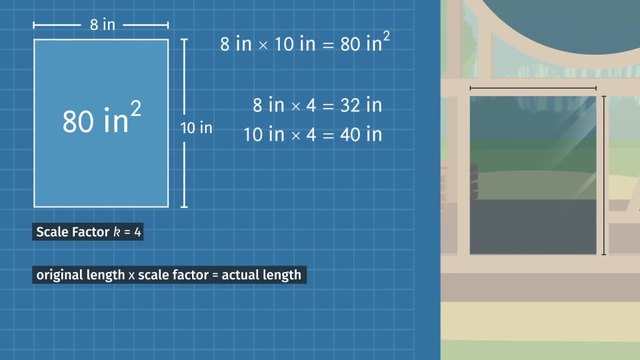
Frank Lloyd Wright, the world-renowned architect, is best known for designing structures with a natural, organic feel. This house set deep in the forest is no exception, so of course it includes a LOT of glass windows. But exactly how much glass is the house going to need? To answer this question and realize his project, Frank Lloyd Wright will have to rely not just on his unique vision but also on how to compute actual areas from a scale drawing. In the blueprints for this idyllic home, we can see that the drawing of this window measures 8 inches wide and 10 inches tall. So what is the area of the drawing of this rectangular window? 8 inches times 10 inches gives us an area of 80 square inches. Of course, because blueprints are a kind of scale drawing, the actual window will be an enlargement of this. How big will the actual window be? To find out, we can use the scale factor, which is listed here on the blueprint, as 4. To find the actual window's area based on this scale drawing we can start by determining the dimensions of the enlargement. Remember, to find an enlarged length, just multiply the length in the drawing by the scale factor. So, 8 inches times a scale factor of 4 is 32 inches and 10 inches times 4 is 40 inches. So the enlarged window should be 32 inches wide and 40 inches tall. From here, we can easily calculate the actual area of the window. 32 inches times 40 inches equals 1,280 square inches. Before we move on, take a look at how we got from the original area of 80 square inches on the blueprint to the window's actual area of 1,280 square inches. Notice the drawing's original area of 80, times the scale factor of 4, squared, gives us our actual enlarged area of 1,280. So the area on the blueprint times the square of the scale factor gave us the window's actual area. Think that will always be true? Let's try another window to find out. The next blueprint is for a triangular accent window. Notice that in the blueprints, the window has a base of 3 inches and a height of 4 inches. So what is the area of the drawing of this triangular window? The area of a triangle can be found by multiplying one-half the base times the height which gives us an area of 6 square inches. So to test our hypothesis from the last example the real window should be this area times the square of the scale factor or 96 square inches. Let's see if we're (Frank Lloyd) right! To check if our formula worked, we can find the actual base and height of the accent window by using the scale factor then just use the formula for the area of a triangle. The real window has a 12 inch base and a 16 inch height which gives us an actual area of 96 square inches. Our formula worked! We might be on to something. Let's take a look at one more detail in the forest house blueprints. Frank based this drawing on a stunning circular window in a cathedral he once saw. He wants to have a window just like it in his forest house, but a little smaller! The reduction will have a scale factor of one-half. If the original window had a radius of 6 feet, how much glass will Frank need for HIS window? First, let's find the area of the original window in the cathedral. Do you remember the formula for finding the area of a circle? Remember the area of a circle is pi times the radius squared to the original window has an area of 36 pi square feet. Now let's plug this value into the formula that we have. Multiplying 36 pi by the square of the scale factor we get 9 pi square feet. Does that sound right? Let's check if our formula worked by calculating the area using the length of the actual radius. Frank's window, a reduction, will have a radius of 3 feet. So the area is pi times 3 squared or 9 pi square feet! To review Blueprints and other scale drawings use a scale factor to represent real-world geometric objects. To calculate actual area based on a scale drawing, take each of the original dimensions and multiply them by the scale factor to get the actual dimensions. Then, use your knowledge of geometric figures to calculate the enlarged or reduced area.
Alternatively, you can use the formula we found and just mutiply the area of the original by the square of the scale factor. The house is going to look great, Frank but maybe you should have done some more research on the neighborhood.


