Constructing Parallelograms with a Set Square


Basics on the topic Constructing Parallelograms with a Set Square
After this lesson, you will be able to construct parallelograms using a ruler, protractor and set square.
The lesson begins by showing you how to construct segments and angles with a ruler and protractor. It leads you to learn how a set square can be used to construct a segment parallel to a given segment, through a specific point. It concludes with using a set square to check if two lines are parallel.
Learn about set squares and parallelograms by helping Bob fix a geometric sculpture!
This video includes key vocabulary such as parallelogram (a quadrilateral with two pairs of parallel sides), ruler (for measuring or constructing segments), protractor (for measuring or constructing angles), and set square (a right triangle we can pair with a ruler to construct parallel lines).
Before watching this video, you should already be familiar with angles, segments, rays, lines, parallel and perpendicular lines, and parallelograms.
After watching this video, you will be prepared to learn how to use a ruler, protractor, and set square to build shapes to given specifications.
Common Core Standard(s) in focus: 7.G.A.2 A video intended for math students in the 7th grade Recommended for students who are 12 - 13 years old
Transcript Constructing Parallelograms with a Set Square
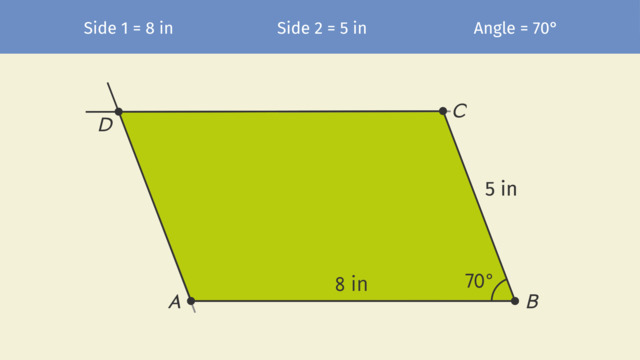
Bob's been taking care of the grounds at Polygon Park for a long time. He usually zips around, mowing in perfect parallel lines. But today he's a bit off and the victim is one of the park's many sculptures. To repair the damage before anyone notices, and keep his job, Bob will need to construct parallelograms with a set square. The sculpture Bob broke was made from hundreds of parallelograms. That means he'll have to construct parallelograms from scratch that match the ones used in the sculpture. Let's see what tools Bob has at his disposal to make sure he has everything he needs to get the job done. First, we've got a ruler, to measure lengths and construct straight segments. Second, we've got a protractor, to measure and construct angles. Finally, we have a set square, which is sometimes called a triangle. In fact, the shape of a set square is a right triangle. With the help of a ruler, a set square can be used to construct parallel lines or check if two given lines are parallel. We have the measurements of two sides and an angle of the parallelogram. To begin our construction, we start with a point, which we will call 'A'. From here we will measure our longest side, 8 inches and mark another point which we will call 'B'. This is one of the sides of the parallelogram. Now we will construct a 70 degree angle at point 'B'. What is the best tool to use when constructing angles of a given measure? A protractor! Place the center of the protractor on 'B' and then put a point at 70 degrees. With the ruler, create a ray through point 'B' and this point. This ray will be the other side of the parallelogram, measuring 5 inches. Let's use our ruler to measure 5 inches from point 'B' along this ray and call this point 'C'. We now have two sides of the parallelogram and one angle completed. Since we are constructing a parallelogram, what do we know about the other two sides? Each one is parallel to an existing side. So let's first construct a segment parallel to 'BC' going through point A. For this, we will need our set square and ruler. Line up one leg of the set square with 'BC' and the ruler with the other leg of the set square. Segment 'BC' is now perpendicular to the ruler, which makes this angle a right angle. Now hold the ruler in place, and slide the set square along the ruler. Any new line we draw along this leg of the set square will be perpendicular to the ruler, giving us another right angle. Since these two angles are corresponding angles and equal, this new line formed on this leg of the set square will be parallel to 'BC'. Now we just have to make sure the parallel line intersects point 'A', so we slide the set square farther along the ruler until point 'A'. After constructing a ray from point 'A' along the set square we extend it with any straight edge. For example, the set square. We've constructed the side that is parallel to 'BC.' Which side will our last side be parallel to? It will be parallel to 'AB', and it will go through point C. Put a leg of the set square on 'AB'... and put the ruler on the other leg. Line 'AB' is perpendicular to the ruler, since the set square is a right triangle. Now hold the ruler in place, and slide the set square along the ruler until it arrives at point 'C'. Hold the ruler tight so it doesn't slip! Construct a ray from point 'C'. Since this ray is also perpendicular to the ruler, it must be parallel to 'AB'. Now extend this ray using a straight edge. The point where this ray and this ray intersect is the last vertex of our parallelogram, which we will label 'D'. Since opposite sides are parallel, this is a parallelogram. Nice work! While Bob works to finish reconstructing the sculpture, let's review an important step in the construction of our parallelogram: constructing a side parallel to another side. Here we are given two sides of the parallelogram, and want to construct a third side parallel to one of them. First, we align one leg of the set square with the given side... and the other leg of the set square with a ruler. Then, we slide the set square along the ruler until we reach the end point of the other side. Finally, we draw our new side. Both of these lines are perpendicular to the ruler, which means they are parallel to each other. After a long day of work, Bob is finally done reconstructing the sculpture. Let's hope no one noticed that it broke! Maybe there are some parallels between being a groundskeeper and making great sculptures.